677 Messages
•
44.6K Points
WebsiteBuilder: Social Elements
Within WebsiteBuilder, there are elements specifically for Social Media. You can link to your social profiles, add buttons to allow viewers to share content, or even like or follow your pages.
To add any of these Social elements, log into WebsiteBuilder, click Elements on the left menu, and choose "Social" from the category list. This will show you the elements available:
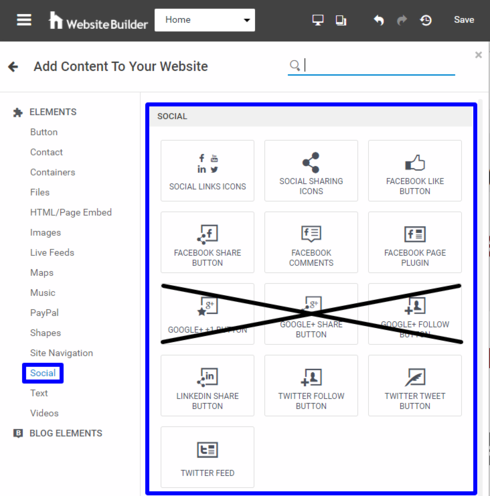
Once you choose any of these options, that element will be attached to your mouse. Simply left-click to drop it on the website, once you have it positioned where you want it.
Social Links Icons-

You will be able to connect your social accounts to these icons so that people will be directed to those pages when they click on one. To attach your accounts to the icons, click on the element and choose "Manage Social Icons". You can click "Add/Remove" in the top right corner of this window to choose different or additional platforms. The accounts you choose will be highlighted with a blue line. Once you've chosen the profiles you want to use, toggle on the option "Connect to my social accounts" and click "Edit". Input the URLs from your social media pages and click "OK". For example, our Facebook URL for the Homestead Websites page is https://www.facebook.com/HomesteadWebsites. This can be copied and pasted directly from the address bar of your Facebook page.
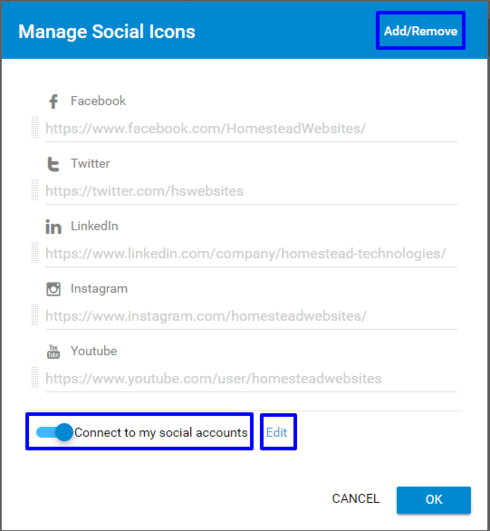
When people click on an icon, that social media page will pull up in a new window of their browser.
Social Sharing Icons-

You can add Share Icons for Facebook, Twitter, and LinkedIn. (Formerly, Google+ was an option as well, but this platform has been shut down) This will allow page visitors to share the page of your website that the element is placed on, on their personal social media pages. *Note: your page visitor needs to log into the social platform on their end*
To choose which platform to display, click on the element and choose "Display Share Icons" Make sure the platforms you want to use are highlighted in a blue line.
Facebook Like Button-

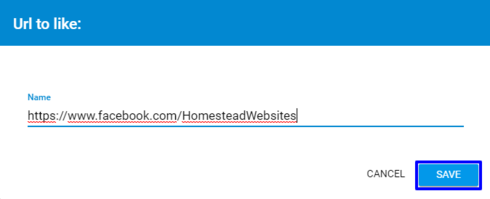
When you add this element to your page, it will immediately ask for the URL of the page you want people to "like". Paste the URL from the address bar of your Facebook page. Then, click "Save".
*Note: This has to be a business page. It cannot be a personal Facebook profile.*
Facebook Share Button-

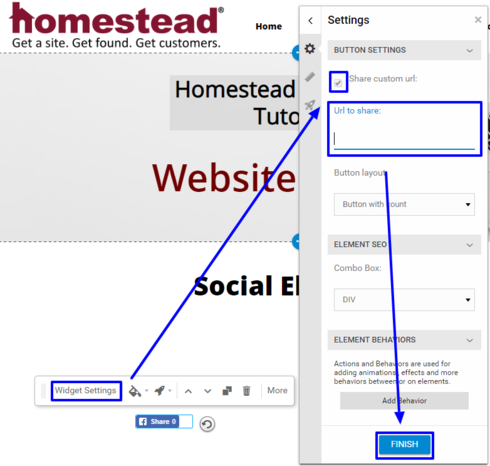
This element will allow you to specify a particular URL you want people to be able to share. It doesn't specifically have to be the page you place it on or even a page of your website. To add a custom URL, click on the element, click "Widget Settings", choose "Settings", and check the box for "Share custom URL". Then, copy and paste the URL into the field and click "Finish".
Facebook Comments-
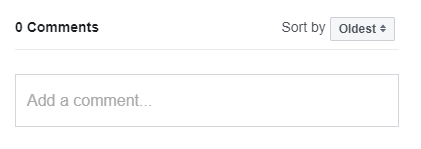
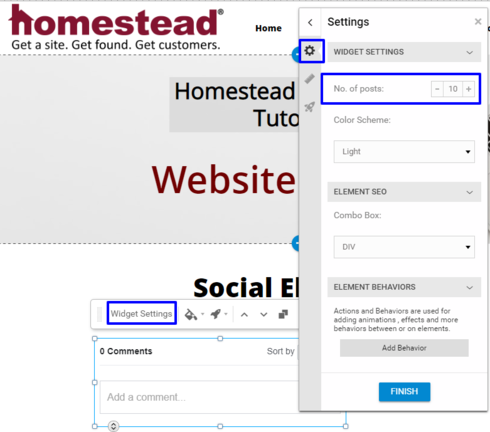
This is an element that will allow site visitors to leave a comment on your website. They would need to be signed into their Facebook account on their computer, though. People that do not have a Facebook profile would not be able to comment. You also cannot remove comments. The only customization you can do it set the number of posts. To do this, click the element, choose "Widget Settings", "Settings", and set the No. of posts.
Facebook Page Plugin-
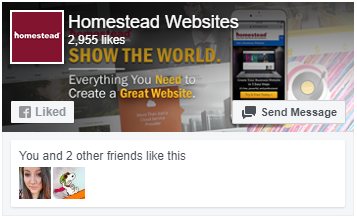
When you add this element to your page, it will immediately ask for the URL of the profile you want to display. Copy and paste the URL from the address bar of your Facebook page. Once that is input, it will display the page's profile and cover photos, a "Like" button, a "Send Message" button, and any Facebook friends that also like this page. (This information is going to be different for each person that views it) Remember again, your page visitor is the one that has to be logged in to properly use this element.
*There are 3 elements for Google+. This platform has been discontinued and those elements will be removed in a future update*
LinkedIn Share Button-

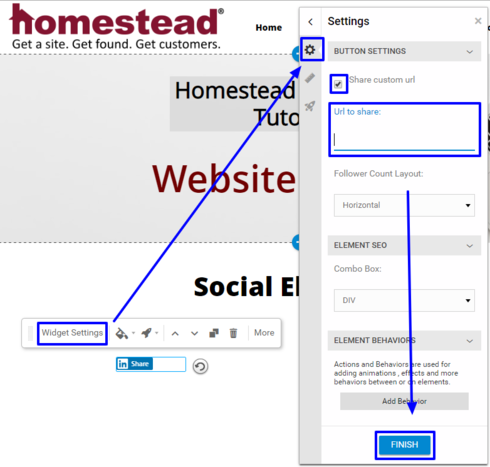
This element will allow people to share the current page or a custom URL either as a post or private message through LinkedIn. As with all of these elements, your page visitor must be logged in to their LinkedIn profile to use this element. To share a custom URL, click on the element, click "Widget Settings", choose "Settings", and check the box for "Share custom URL". Then, copy and paste the URL into the field and click "Finish".
Twitter Follow Button-

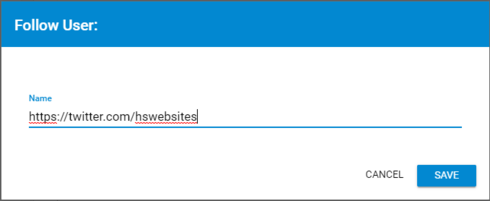
This button will allow page visitors to easily follow your Twitter page from your website, as long as they are logged into their Twitter account. When you add this element to your page, it will immediately ask for the URL of the profile you want people to follow. Copy and paste the URL from the address bar of your Twitter profile and click "Save"
Twitter Tweet Button-

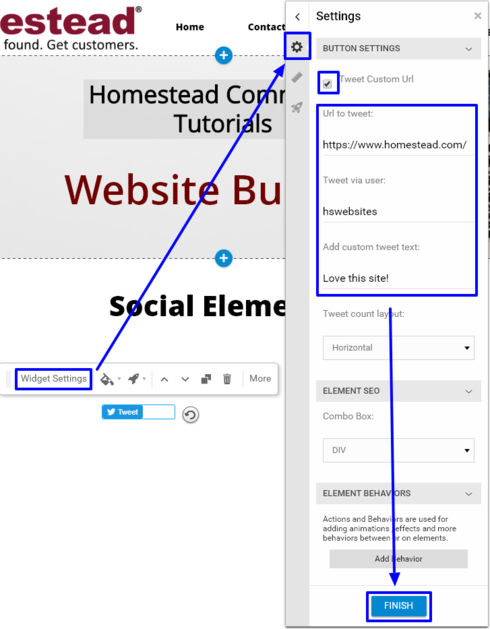
This element will allow you to specify a particular URL you want people to be able to tweet. It doesn't specifically have to be the page you place it on or even a page of your website. To add a custom URL, click on the element, click "Widget Settings", choose "Settings", and check the box for "Tweet custom URL". Then, copy and paste the URL into the field. You can also add your twitter handle if you want people to be able to "@" your profile in their tweet. Lastly, you can add custom text to be added to this tweet. When you're done adding this information, click "Finish".
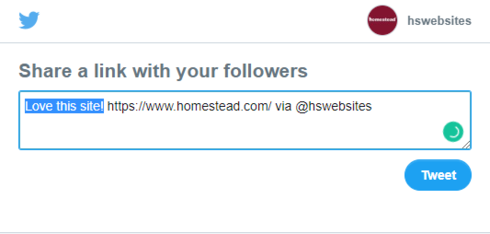
With those settings, the automated tweet will look like this:
Twitter Feed-

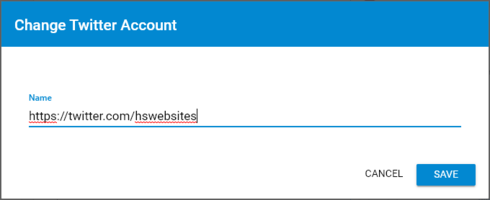
This element will display the most recent tweets from your Twitter page. When you add this element to your page, it will immediately ask for the URL of the profile you want people to follow. Copy and paste the URL from the address bar of your Twitter profile and click "Save"
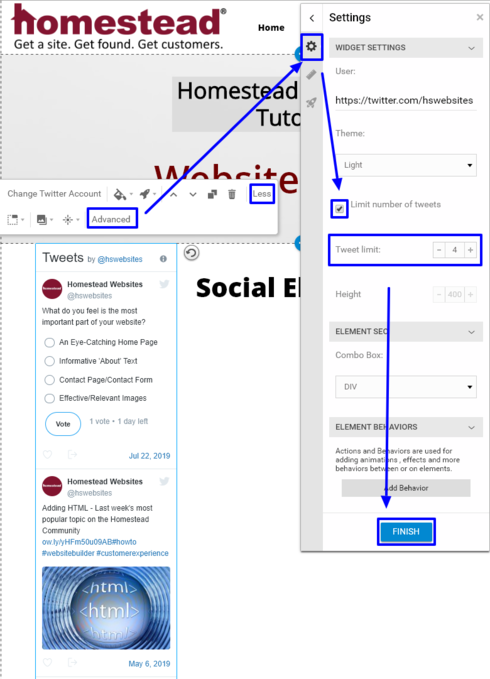
You can customize the number of posts that are displayed by clicking on the element, choose "More" > "Advanced" > "Settings". Check the box that says "Limit number of tweets" and set your limit. Then, click "Finish"
To add any of these Social elements, log into WebsiteBuilder, click Elements on the left menu, and choose "Social" from the category list. This will show you the elements available:
Once you choose any of these options, that element will be attached to your mouse. Simply left-click to drop it on the website, once you have it positioned where you want it.
Social Links Icons-
You will be able to connect your social accounts to these icons so that people will be directed to those pages when they click on one. To attach your accounts to the icons, click on the element and choose "Manage Social Icons". You can click "Add/Remove" in the top right corner of this window to choose different or additional platforms. The accounts you choose will be highlighted with a blue line. Once you've chosen the profiles you want to use, toggle on the option "Connect to my social accounts" and click "Edit". Input the URLs from your social media pages and click "OK". For example, our Facebook URL for the Homestead Websites page is https://www.facebook.com/HomesteadWebsites. This can be copied and pasted directly from the address bar of your Facebook page.
When people click on an icon, that social media page will pull up in a new window of their browser.
Social Sharing Icons-
You can add Share Icons for Facebook, Twitter, and LinkedIn. (Formerly, Google+ was an option as well, but this platform has been shut down) This will allow page visitors to share the page of your website that the element is placed on, on their personal social media pages. *Note: your page visitor needs to log into the social platform on their end*
To choose which platform to display, click on the element and choose "Display Share Icons" Make sure the platforms you want to use are highlighted in a blue line.
Facebook Like Button-
When you add this element to your page, it will immediately ask for the URL of the page you want people to "like". Paste the URL from the address bar of your Facebook page. Then, click "Save".
*Note: This has to be a business page. It cannot be a personal Facebook profile.*
Facebook Share Button-
This element will allow you to specify a particular URL you want people to be able to share. It doesn't specifically have to be the page you place it on or even a page of your website. To add a custom URL, click on the element, click "Widget Settings", choose "Settings", and check the box for "Share custom URL". Then, copy and paste the URL into the field and click "Finish".
Facebook Comments-
This is an element that will allow site visitors to leave a comment on your website. They would need to be signed into their Facebook account on their computer, though. People that do not have a Facebook profile would not be able to comment. You also cannot remove comments. The only customization you can do it set the number of posts. To do this, click the element, choose "Widget Settings", "Settings", and set the No. of posts.
Facebook Page Plugin-
When you add this element to your page, it will immediately ask for the URL of the profile you want to display. Copy and paste the URL from the address bar of your Facebook page. Once that is input, it will display the page's profile and cover photos, a "Like" button, a "Send Message" button, and any Facebook friends that also like this page. (This information is going to be different for each person that views it) Remember again, your page visitor is the one that has to be logged in to properly use this element.
*There are 3 elements for Google+. This platform has been discontinued and those elements will be removed in a future update*
LinkedIn Share Button-
This element will allow people to share the current page or a custom URL either as a post or private message through LinkedIn. As with all of these elements, your page visitor must be logged in to their LinkedIn profile to use this element. To share a custom URL, click on the element, click "Widget Settings", choose "Settings", and check the box for "Share custom URL". Then, copy and paste the URL into the field and click "Finish".
Twitter Follow Button-
This button will allow page visitors to easily follow your Twitter page from your website, as long as they are logged into their Twitter account. When you add this element to your page, it will immediately ask for the URL of the profile you want people to follow. Copy and paste the URL from the address bar of your Twitter profile and click "Save"
Twitter Tweet Button-
This element will allow you to specify a particular URL you want people to be able to tweet. It doesn't specifically have to be the page you place it on or even a page of your website. To add a custom URL, click on the element, click "Widget Settings", choose "Settings", and check the box for "Tweet custom URL". Then, copy and paste the URL into the field. You can also add your twitter handle if you want people to be able to "@" your profile in their tweet. Lastly, you can add custom text to be added to this tweet. When you're done adding this information, click "Finish".
With those settings, the automated tweet will look like this:
Twitter Feed-
This element will display the most recent tweets from your Twitter page. When you add this element to your page, it will immediately ask for the URL of the profile you want people to follow. Copy and paste the URL from the address bar of your Twitter profile and click "Save"
You can customize the number of posts that are displayed by clicking on the element, choose "More" > "Advanced" > "Settings". Check the box that says "Limit number of tweets" and set your limit. Then, click "Finish"


rrousley
1 Message
•
114 Points
5 years ago
1
0